Tuesday, February 25, 2014

Update to Organizing the Craft Room

Two years ago I started working on my craft room. You can see my original post here. 

Shortly after I cleaned everything out of the room, family came to town and it was turned into a bedroom, then an office, then storage, back to a bedroom and then back to storage.... Oh where did my craft room go???

About 6 weeks ago I decided it's time to get my craft room back! It took a couple of days to get everything cleaned out, and put back together.

Today I made a change I'm so happy with!

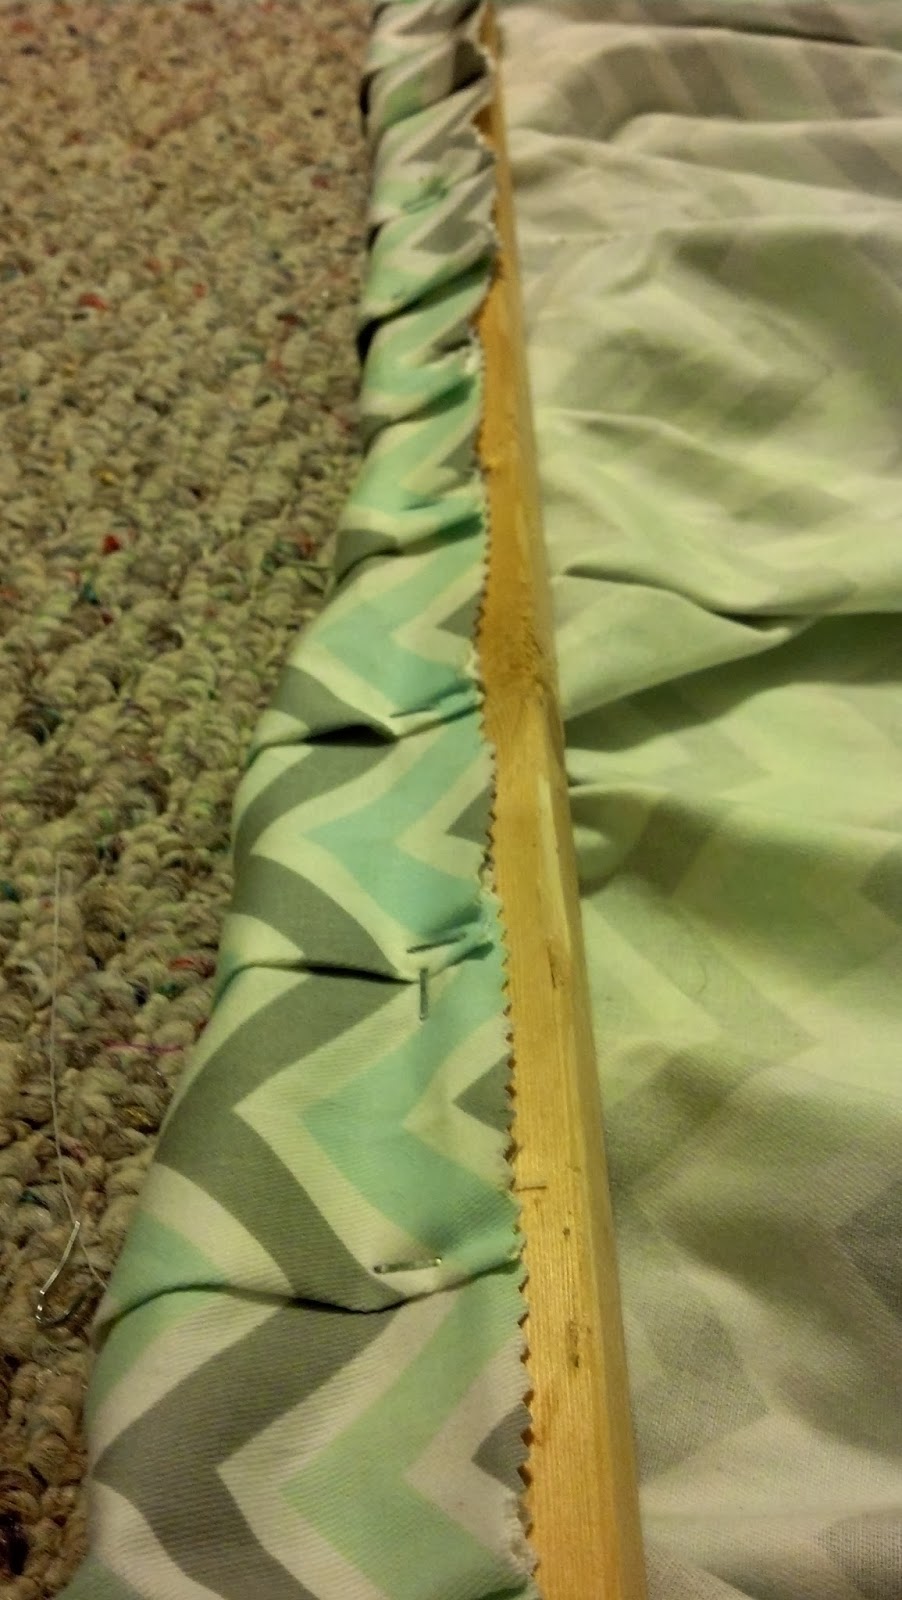
I have these wonderful built-ins perfect for storage. I added a skirt to the bottom covering the drawers and cabinet. 


I played this one by sight... I had the chevron material on hand for about a year or longer. Our town has a fabric warehouse selling once a month to the public at ridiculously low prices. I picked up 6 yard for $8.00! 

I used a 7 foot strip of 1x1. I seriously had no idea if this would turn out like I had pictured in my head... I figured out how to make a pleat and used the staple gun to hold in place.


Then I just lifted the fabric and screwed the 1 by in place.


I'm pretty happy with how it turned out. I did not sew the seam or the bottom of the fabric. I used pinking shears which should help the fabric hold up and keep from fraying.

Thursday, February 20, 2014

Fabric Covered Tin Cans For Organizing

~This was a fun and easy project to complete~


I've been working on my craft room for a year or two years... (See this post if you want to know how it became the craft room, because I am not about to bore you out of your mind!)
On to the project. I made several tin can organizers a couple years ago. I used scrapbook paper to make them and surprisingly they held up better than I thought they would.
Since my craft room is now slash my home office, I have once again began the task of revamping and organizing. I've become a little obsessed with tin cans which behooves my hubby to no end! (at this point he no longer asks what I am creating, he just waits for instructions, LOL)

Supply List:

Fabric of your choice
Tin cans
Hot glue gun
Scissors
Mason jar lid (say what!)
yard stick (OCD optional)
pen (OCD Optional)


Lay out your fabric and cut out a length enough to wrap around the can. 

This is where my OCD kind of takes over. For my own peace of mind I used my yard stick and pin and drew a line out on the fabric so it would be straight.

Can you see the line?

Because the tin cans vary in size I can't tell you what length to cut the fabric, however, I cut the width about 1/4" longer than the can on the bottom and about 1" longer on top. 


Add a vertical bead of hot glue down the can and press the fabric to it.

Wrap the fabric and add another vertical bead of hot glue.


Now run a bead of hot clue on the inside lip of the can and fold over your fabric.

repeat for the bottom of the can
(believe it or not but that sticker stayed intact through a dishwasher cycle!)

I used a mason jar lid to cut out a circle of fabric for the bottom of my cans. It just so happened to work perfectly.
 And again with the hot glue gun put a bead in the center an round the outer edge and press the circle onto the can. I think it makes the project look finished.
There are 2 cans here I used spray paint, twine and flowers. And although you cannot tell in the photos, the colors match perfectly with the owls.

The the twine cans I simply spray painted them, allowed to them to dry wrapped twine around them and then flowers for accent.

I am so excited about this project! I would love to see your tin can projects and know what you think of mine!

Happy Pinteresting,

Mel :D


Saturday, February 8, 2014

Key Holder

Seriously, I ALWAYS lose my keys. I am forever looking for them, asking everyone in the house where are they, and stressing out because I can't find them.  If I would simply put them in my pocketbook, on my dresser, or even on the kitchen counter... But nope, I find them everywhere, under the couch, in the bath room, left in the door (yes, on multiple occasions), in my son's room, in the basement, and I have even found them in the spice drawer!!!

I have decided since I am turning the BIG 4-0 this year it is time to get my key disorganization under control, and that is how this little project got started.


This took about an hour and that's because the paint had to dry. 

You will need:

Fabric (you could also use scrapbook paper)
Picture Frame
Hooks
Your Initial
Spray Paint


I found this adorable print last month at Phoenix Fabrics. They are a fabric warehouse open once a month to the public. I go almost every month! I think I paid $4 for about 2.5 yards. I have plenty left over for my pillows.


My initial and the frame came from the Goodwill about a year ago, I paid $1 each for them. I spray painted them with this wonderful product from Valspar. The color is called Exotic Sea in a gloss finish. I bought this a year ago at Lowe's I think it was around $5.


I laid the glass out and cut about 1/4 of an inch around it.


Placed the glass back into the now painted frame, put fabric on top of that, and then the back of the frame.


I hot glued my initial and centered to the picture frame and then added 4 hooks at the bottom.


I think it turned out really well! And since I had everything this technically was a FREEBIE :)


See the aforementioned keys!!! They are actually where they should be, LOL!

I would love to know your thoughts!!!

Have a wonderful day,

Mel:D


Friday, January 31, 2014

South Carolina Gamecocks Rag Wreath

This was a fun wreath to make!!!


It started with this


1.5 yards of Gamecocks Fabric
1.5 yards of black broadcloth
1.5 yards of garnet Organza 
I had white tulle, black tulle, and a red tulle I didn't end up using, but it's in the photo.

Cut your fabric in to 9"x1" strips.
(I cut all this tulle before I decided not to use it!) 

Set up an assembly line rotating your fabric strips.

Starting at the inner most circle of your wire wreath form begin tying your strips on.
I didn't take a photo for this process with this wreath, but below is a photo from my 4th of July rag Wreath.


The fabric was enough for 3 rings

If I do another on I think I will double the Gamecock Print and make every other strip the Gamecock Print.

After I finished all the ties I got to work on the USC letters.

The letters were a bit tricky because they are heavy and I didn't want them to squish the fabric. I came up with something, but PLEASE if you figure out a better way let me know!!!!

Let me back up a couple of steps.

First I added the polka dots. I found the perfect sample for .50 cent at Lowe's! 
(please ignore the background mess!)

It truly is a perfect Gamecock Garnet, although it does show up bright in this photo!


I painted the outsides white


Now, moving forward...
I added 2 hooks to the backs of the letters U and C, one on top and the other on bottom


Again, with the no photos. I took a piece of heavy gauge wire (I have no idea what gauge, I just know I had to use the needle nose pliers to get it to bend!) I threaded it through and hot glued it into place. 

Once this was done, I turned the letters over and used the staple gun to secure the letters together and added a drop of hot glue for good measure.  
*Note: make sure your wire is all cut the same length and better to be to long than to short!

I started the "C" and centered it to the bottom of the wreath and the others just lined right up. *This is why I glued and stapled the letters together.

This part is a little tricky and why I asked if you have a better idea to let me know!

With the letter face down take the wreath and place it on top of the letters. Remember I said I didn't want the letters to squish the fabric...  Lift up on the wreath enough that the letters slightly touch the fabric. Then take  your needle nose pliers and bend the metal over the wire form. (kind of like fishing hook or "J")
You will do this to a both the U and C. 

Now a Check:  Flip the wreath over and your letters should be right where you want them. If not you can adjust them here.  

Again, flip the wreath over and now secure the letters in place, using the needle nose pliers wind the hook around the wire form 3 times. This REALLY secures your letters in place and you can add a drop of hot glue for good measure.

It needed something else, but I didn't want a bow. How about some garnet feathers!!! SAY WHAT!


I found these Gems a year ago at Hobby Lobby for 90% off!!!!!!! 

Get a black pipe cleaner

I took 4 bunches of feathers, 2 to the left and 2 to the right and bound them with a pipe cleaner (these are not the ones I used, but for visual purposes here you go)


I then attached them with a pipe cleaner.


And Voila!!!


High 5 Gamecock Nation!!!!


Sunday, January 26, 2014

4th of July Rag Wreath

This is a super EASY project! It does take a little time to complete, but the results are worth it!  I happened across this burlap rag wreath video, and thought ohhhhh new obsession! 


Disclaimer, I didn't set out to make another 4th of July wreath, I thought I would make the burlap wreath, but when I got to Hancock Fabric and was searching through the clearance rack.... Well, you can take it from there, LOL.  On another side note, I also went to Phoenix Fabric that weekend and rummaged through their scrap bins and picked up a 4th of July print.

All in, this cost almost $11.00 to make, which includes tax. Don't forget you can download apps on your smart phones for Michael's and Hobby Lobby coupons. I picked up the wire wreath form for 40% off, it only cost me $1.79.

Now, that that is out of the way.


Supply list:

Fabric ( I am guestimating but I got about 1-1.5 yards of each fabric)
Wire Wreath Form (Medium)
Sharp Scissors
Yard stick or measuring tape

I love fabric, but I do not know the difference in them, so I can't tell you if it's poplin, cotton blend, rayon etc... What I can tell you is, the white fabric was a little stretchy, the red with the white stars is shinny and not easy to cut, it is very clingy, the stars and stripes is stiff, and the blue with small white stars is; I think, plan ol' cotton fabric.

*The stars and stripes is printed and the red with white stars fabric is printed on both sides. This is something I suggest you find. If all the fabric is only printed on one side, I personally don't think it would have turned out so well.

My circle fabric cutter you see in the above photo didn't work well cutting. You don't need one!

The most time consuming part is cutting the fabric. I cut long 1 inch strips and then cut those down to 9 inch strips. (For all my fellow OCDer's it does not have to be perfectly 1 inch by 9 inch strips. As my eyes were crossing from all the cutting, some are more narrow others are wider!

 
After all the strips were cut, the fun begins. It  didn't take long to tie them on the wire form maybe 1.5 hours.
 
I started at the inner most circle and worked around. I made an assembly line and I went from one fabric to the next.
 
 
When I was ready to start the second row I pushed the first row of fabric toward the center of the wreath form to give myself working room.
 
 
When I finished the 2nd row, I was almost out of white fabric, so I stopped there. I though about going back for more fabric, but the wreath is full and looks great!!!  I'm super happy how it turned out. My next rag wreath will be a Gamecocks wreath.


I thought about adding some ribbon or an initial... Would love to hear what you would do!
 

Sunday, December 8, 2013

Thanksgiving, Dollar Tree and Cost Effective Decorations


I have pinned so many things for decorating for Thanksgiving. I am a bit obsessed with Pinterest, and I am sure some of you know what I mean.  I shop thrift stores year round for different items. All the candle globes came from the Goodwill, Salvation Army and Dollar Tree. I paid less than $1.00 each for them.

Happy Thanksgiving Banner


Material List

Twine
Scissors
Hot Glue
Burlap or Linen
Letters
Leaves
Safety Pins


I picked up the leaves and paper letters from the Dollar Store, I've had the twine on hand for a couple of years.


Paper Letters. There are 3 of each letter so I had enough to do one Happy Thanksgiving and Merry Christmas.


I'm a lucky girl, the town I live in has a fabric ware house called Phoenix Fabrics, they are open once a month to the public. It is an amazing warehouse full of every possible fabric. I picked up a scrap of linen several months ago for less than $3.00. I was thinking of making a runner for the dining room table, but that project never happened. LOL!

Disclaimer: I didn't take photos of each step, but it really is pretty simple.

First, I made the streamer to hold the linen flags. I made it long enough with little swag. I made 2 of these on for Happy and the other Thanksgiving.

I didn't measure out how far apart the leaves were, I just randomly hot glued them to the twine.


Flags

I made a template from a brown paper bag, laid it on the linen and then cut out my flags. They are roughly 4" wide at the top. They are not perfectly straight (this was a little difficult for my OCD to swallow) But my creative side, "ohhh that looks so good!" LOL 


I hot glued my letters simply because I was out of Tacky Glue. It worked very well.

There are times my OCD has full control and making sure the banner was centered to the fireplace opening was non-negotiable. FYI, the fireplace is non-working (no chimney).

First, I hung the twine for Happy. The first P was the middle letter so I centered it with the opening. I used the safety pins and attached each side to the twine. I did the same thing for Thanksgiving.


This took about and hour to finish give or take 15 minutes.

The Windows

I didn't take photos of the process, but it is sooooo simple and really added to the feel of the room.

I went across the street and pick up pine cones and hot clued them to twine. I then tied them to the tension rod.  The larger windows I added leaves too and again tied it to the rod.


The Candles


I 5 of these candle at the Dollar Tree, wrapped them in twine and tied a bow in front.

Before

After


I bought pinto and Lima beans and orange split peas and filled the globes and mason jars. I tied twine around the candles in the jars and on the outside of the mason jars.


I set some of these in the fireplace, some on the mantle, and others on the dinner table.

At the back of the fireplace I placed a mirror to reflect the light. I wish the mirror was large, but this was all I had on hand and it was a last minute idea.


Basket of flowers


On top of the mantle I placed of basket of flowers I've collected over the past year or so. I use them for wreaths. It worked out really well they happened to be fall colors, deep oranges, reds, purples.


Simple, cheap and fun to make, it doesn't get any better than that!

Would love to see your Turkey Day decor :)

Mel :D