Showing posts with label organize. Show all posts

Tuesday, February 25, 2014

Update to Organizing the Craft Room

Two years ago I started working on my craft room. You can see my original post here. 

Shortly after I cleaned everything out of the room, family came to town and it was turned into a bedroom, then an office, then storage, back to a bedroom and then back to storage.... Oh where did my craft room go???

About 6 weeks ago I decided it's time to get my craft room back! It took a couple of days to get everything cleaned out, and put back together.

Today I made a change I'm so happy with!

I have these wonderful built-ins perfect for storage. I added a skirt to the bottom covering the drawers and cabinet. 


I played this one by sight... I had the chevron material on hand for about a year or longer. Our town has a fabric warehouse selling once a month to the public at ridiculously low prices. I picked up 6 yard for $8.00! 

I used a 7 foot strip of 1x1. I seriously had no idea if this would turn out like I had pictured in my head... I figured out how to make a pleat and used the staple gun to hold in place.
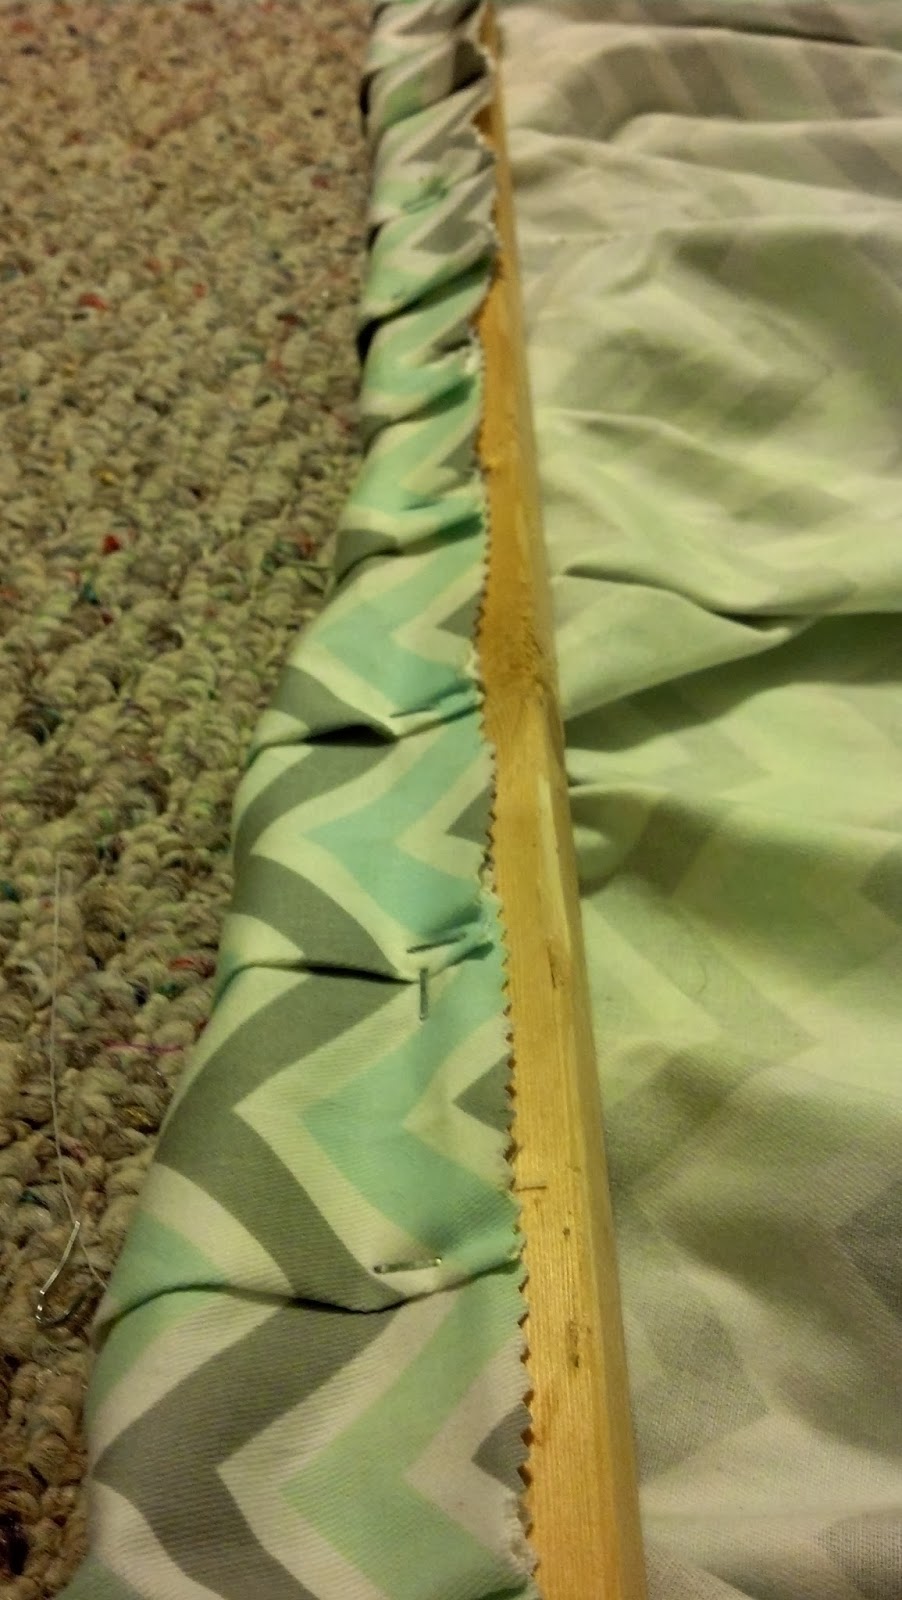

Then I just lifted the fabric and screwed the 1 by in place.


I'm pretty happy with how it turned out. I did not sew the seam or the bottom of the fabric. I used pinking shears which should help the fabric hold up and keep from fraying.

Thursday, February 20, 2014

Fabric Covered Tin Cans For Organizing

~This was a fun and easy project to complete~


I've been working on my craft room for a year or two years... (See this post if you want to know how it became the craft room, because I am not about to bore you out of your mind!)
On to the project. I made several tin can organizers a couple years ago. I used scrapbook paper to make them and surprisingly they held up better than I thought they would.
Since my craft room is now slash my home office, I have once again began the task of revamping and organizing. I've become a little obsessed with tin cans which behooves my hubby to no end! (at this point he no longer asks what I am creating, he just waits for instructions, LOL)

Supply List:

Fabric of your choice
Tin cans
Hot glue gun
Scissors
Mason jar lid (say what!)
yard stick (OCD optional)
pen (OCD Optional)


Lay out your fabric and cut out a length enough to wrap around the can. 

This is where my OCD kind of takes over. For my own peace of mind I used my yard stick and pin and drew a line out on the fabric so it would be straight.

Can you see the line?

Because the tin cans vary in size I can't tell you what length to cut the fabric, however, I cut the width about 1/4" longer than the can on the bottom and about 1" longer on top. 


Add a vertical bead of hot glue down the can and press the fabric to it.

Wrap the fabric and add another vertical bead of hot glue.


Now run a bead of hot clue on the inside lip of the can and fold over your fabric.

repeat for the bottom of the can
(believe it or not but that sticker stayed intact through a dishwasher cycle!)

I used a mason jar lid to cut out a circle of fabric for the bottom of my cans. It just so happened to work perfectly.
 And again with the hot glue gun put a bead in the center an round the outer edge and press the circle onto the can. I think it makes the project look finished.
There are 2 cans here I used spray paint, twine and flowers. And although you cannot tell in the photos, the colors match perfectly with the owls.

The the twine cans I simply spray painted them, allowed to them to dry wrapped twine around them and then flowers for accent.

I am so excited about this project! I would love to see your tin can projects and know what you think of mine!

Happy Pinteresting,

Mel :D


Friday, April 27, 2012

Painted Table for the Craft Room

I've slowing been working on my craft room... Very Slowly (see previous post here) I've had this dark espresso table for about 10  years. Side note: I am soooooooooo very tired of brown and black! Anyhoo, this table has been in our basement since we moved here almost 3 years ago. Another side note: we use our basement as much as we use the upstairs, lots and lots of natural light!

Moving right along the table, see photo below, I can't stand the color. I've wanted to paint if for years, but scared to do it. 


I pulled up my big girl panties and while the hubby was out of town I got out the paint. I had paint on hand and didn't buy anything, but clear polyurethane.

Supply list: FOAM ROLLER IS A MUST MAKES FOR A NICE SMOOTH SURFACE.
FOAM BRUSH
PRIMER
PAINT
CLEAR COAT POLYURETHANE
220 GRIT SAND PAPER

First I washed the table down with STP. It's this great product you can get at Lowe's or Home Depot. It kept me from having to sand the table :) An absolute MUST HAVE!

I'm a little OCD so I primed the table 3 times with and enamel based primer.


I let the primer dry according to the directions on the can. The second day I got out a can of paint I bought 3 years ago (I had never used) a foam roller and painted the legs. Its a pretty light green/blue color.

(TAKE YOUR TIME DON'T HURRY THE PROCESS! YOU'LL GET THE BEST RESULTS)

For the table top I used a color called Steamed Vanilla from Lowe's. This particular paint was left over from a different project and has a satin finish. I painted 3 coats, (this is going to be my crafting table and knew it would be abused!) I let it set for another day and then did the first coat of polyurethane. I let that set for a day, sanded with 220 grit sandpaper and then added another coat of polyurethane. 

Now,  isn't that better!


 I wish you could see the colors better, it's so light and airy :)  And can I just say GOOD BY BROWN!!!!


Sunday, April 22, 2012

Family Tree Frame

I can't believe it's been a month since my last project!! Poor me :( My crafty creating has been put on hold as baseball has taken over our lives!!! 

This is a very quick and simple project.


Family Tree Frame

 This is my before attempt at a family tree for my Bubba Gump (I started this project in June 2004!)


This pre-made, pre-packaged, and broken photo collage, has sat in a closet since July 2004.

Today I pulled the pre-made, pre-packaged, broken photo collage out of the closet about the throw it away. I was looking at it and thought. Hmmmmm.... PINTEREST!!!!!!!

I threw the broken glass away and removed the photos.


I painted the black frame Morning Mist from Lowe's-Valspar brand. I've had this paint on hand for almost 3 years and never used it until today!!! Took some twine I had and got out the hot glue gun.
You only need the hot glue in the beginning and the end!


Take the twine and wrap around the frame. Hang the frame and use clothes pins to secure the photos.


FYI: We have 6 cousins and 2 Aunts to add!!!!

Sunday, February 26, 2012

OrGanIziNG tHE CraFT ROOm

I love my house! I'm a Realtor and found this little (3200 sq ft) gem when the market tanked. Foreclosures were not yet prevalent, and this one just happened to be one. I knew the area and knew I could fix her up and make her a happy home for my family....

Yes, this did happen in our house!!!
Can we say Money Pit! You remember that 1980's movie with Tom Hanks and Shelly Long! Well, she's not that bad, and not terrible just a lot of updating. She's a 1969 brick ranch with a full basement. Just FYI, if your not from this area, homes with a basement are not typical.  (So, score one for the home team! :)  Anyway, we've been here for almost 3 years and have been working on the house and making it our own.


The basement is over 1600 sq feet, the heat doesn't work and we are not yet ready to install a new unit. However, we throw a good who-da (mama and I made up this word for party) in our basement in the spring, summer and fall months.... why am I telling you all this and do you really care???  Because in the basement we have a room that is 14x15 with built in shelves.  When I first laid on our house I knew what I wanted this room to be.  I knew it would make the perfect craft room...  Well, that didn't happen!!!! For the first year it was a junk room, then a year as a toy room, then six months or so as a movie room, and the last 3 months a bedroom. 

HELLO!!! What happened to my craft room!!! I finally got it yesterday! WOOT-WOOT!!!! Now, I've got to organize it!  And in case you don't know organizing is a therapy for me :-) as long as I'm working by myself or telling someone (hubby ;-)) what to do and where to put it, LOL!

So, here I am on Sunday afternoon at 4:30 looking at this room and wondering where to start!!!


SEE BELOW

{SIGH}

AND ANOTHER.... {SIGH}


I'll post new photos when I've got 'er done!


Saturday, February 25, 2012

I Can Do!


I saved several cans for my son to throw his angry birds at... He liked it for about a week and he was over it, time for a new game I guess!


As I was cleaning house today I found them under the bed, in a drawer, in a basket, and in the toy bin. I gathered them up to throw away and had a thought!  ORGANIZE!!!! I knew I saw someone use cans on Pinterest and make them cute, so why not me!


After the house was clean, hubby left for work, and Bubba Gump watching a movie I got started.


Supply List:

  • Paper
  • Scissors
  • Cans
  • Glue (I had Tacky Glue on hand)
  • A ruler of some sort....


Now you would think this would be pretty straight forward, but well I tend to make things harder than they need to be...


lay your can on your paper and mark it and cut


I've had this ruler cutter thing for years! LOVE IT!!

Put you glue on the PAPER not the CAN!!! It was trial and error here! 

Then wrap it around


I did one can in twine I've had on hand for forever.