Sunday, February 26, 2012

OrGanIziNG tHE CraFT ROOm

I love my house! I'm a Realtor and found this little (3200 sq ft) gem when the market tanked. Foreclosures were not yet prevalent, and this one just happened to be one. I knew the area and knew I could fix her up and make her a happy home for my family....

Yes, this did happen in our house!!!
Can we say Money Pit! You remember that 1980's movie with Tom Hanks and Shelly Long! Well, she's not that bad, and not terrible just a lot of updating. She's a 1969 brick ranch with a full basement. Just FYI, if your not from this area, homes with a basement are not typical.  (So, score one for the home team! :)  Anyway, we've been here for almost 3 years and have been working on the house and making it our own.


The basement is over 1600 sq feet, the heat doesn't work and we are not yet ready to install a new unit. However, we throw a good who-da (mama and I made up this word for party) in our basement in the spring, summer and fall months.... why am I telling you all this and do you really care???  Because in the basement we have a room that is 14x15 with built in shelves.  When I first laid on our house I knew what I wanted this room to be.  I knew it would make the perfect craft room...  Well, that didn't happen!!!! For the first year it was a junk room, then a year as a toy room, then six months or so as a movie room, and the last 3 months a bedroom. 

HELLO!!! What happened to my craft room!!! I finally got it yesterday! WOOT-WOOT!!!! Now, I've got to organize it!  And in case you don't know organizing is a therapy for me :-) as long as I'm working by myself or telling someone (hubby ;-)) what to do and where to put it, LOL!

So, here I am on Sunday afternoon at 4:30 looking at this room and wondering where to start!!!


SEE BELOW

{SIGH}

AND ANOTHER.... {SIGH}


I'll post new photos when I've got 'er done!


Saturday, February 25, 2012

I Can Do!


I saved several cans for my son to throw his angry birds at... He liked it for about a week and he was over it, time for a new game I guess!


As I was cleaning house today I found them under the bed, in a drawer, in a basket, and in the toy bin. I gathered them up to throw away and had a thought!  ORGANIZE!!!! I knew I saw someone use cans on Pinterest and make them cute, so why not me!


After the house was clean, hubby left for work, and Bubba Gump watching a movie I got started.


Supply List:

  • Paper
  • Scissors
  • Cans
  • Glue (I had Tacky Glue on hand)
  • A ruler of some sort....


Now you would think this would be pretty straight forward, but well I tend to make things harder than they need to be...


lay your can on your paper and mark it and cut


I've had this ruler cutter thing for years! LOVE IT!!

Put you glue on the PAPER not the CAN!!! It was trial and error here! 

Then wrap it around


I did one can in twine I've had on hand for forever.


Memories

I posted on my Facebook wall earlier this moring (8:48am right now) that I felt a Pinterest project coming on, and I do. First things first though cleaning the house! You know how you come in at the end of the day and you are just to tired to do anything, but feed your family and put the kids to bed... It's been that kind of week.  Bubba Gump spent the night with his Nanny last night, hubby had to work last night and is still in bed. The house is quiet, Nora Jones (my fav!) in playing on the CD player, coffee is brewed, I started cleaning and then.....

I started thinking about my house and neighbors and their kids. How wonderful my neighbors are (they truely are the best) and you know how your mind begins to wonder.... 

The kids were over yesterday and met my Bubba when he got off the bus they played b-ball for a while. I went out and talked with them and came inside then Nanny came and picked up Bubba. I went back to working on my pc, hubby watching the news before he had to leave for work. You know those typical days...

There was a knock on the door and it was one of the neighbor boys. Hubby went to answer the door and he asked if I could come out and play! OMGosh, how sweet is that!  Here's where I royally screwed up! Hubby told him I couldn't because I was finishing up something for work. I didn't give it another thought until I was in my kitchen 15 minutes ago.

I thought back to when I was that age and I use to go over to my neighbors house all the time. Now, they were my grandparents age and no kids around, but my brother and I loved spending time with them. (side note, I am not my grandparents age I'm only 37!) We had a ball and they always made time for my brother and I. Mrs. Gladys passed away several years ago, and I still see Edrew (I called him Egore when I was litte) <3 that ol' man!

Next time I'm going out to play! I want to be remembered like that. I smile when I think of Gladys and Edrew, I have tons of stories and the things they taught me. How to kill and skin a chicken (yes, I did it!) baking potatoes in the ground, talking to Amelia Earhart (Big Fish), playing with the ferret, walking on stilts, planting a garden. So, many things to remember!

Wednesday, February 22, 2012

Kiss My Pie


So, I found the recipe on Pinterest (where else! LOL) so very easy my hubby could do it! *shhh* don't tell him I said that! LOL. Of course I will gladly give credit where credit is due, but I didn't "pin" this recipe... as soon as i run across it I'll post where I found it:)


Supply List:

pre-made pie crust
Hershey Kisses
Powdered Sugar
1 egg white
Doughnut Cutter (from my aunt lisa!)


First take a little of the powdered sugar and put some on the table, roll your pie crust out on top of the powered sugar.


Get the cutter and begin cutting out your circles. Make  your circles approximately 2x2.


Get your Hershey Kisses out and begin to unwrap and place 1 in the center of each circle.


pull up sides and pinch together

spray your pan!


take the egg white, beat, and "paint" onto the crust

bake at 350 for 10-12 minutes.

sprinkle with powdered sugar.


Where to Go From Here...

I have these 3 wonderful photos of my boy.  They sat on my living room floor for about 3 months until my hubby hung them for me... I had family coming in town for the holidays and wanted them off the floor, but I really don't know what to do with them..........

the wall is really long, my couch is along the wall under the photo's although not in this photo! I'm open to suggestion PLEASE!!!!


give me ideas people!


update 2-25-12: OK, it is several days later and i still haven't a clue.... well i have an idea, but can't commit to it

Sunday, February 19, 2012

Homemade Modge Podge

While surfing Pinterest I found an interesting Spring project I want to attempt. It called for Modge Podge.... Of course I Googled Modge Podge and found out it is used for decoupaging... Modge Podge is relativity expensive, so I made my own ;o  I found the recipe here. If  you don't wanna follow the link see below. It's so simple and works great!!!!!!

Supply List:

8 oz jelly jar
Elmer's Glue


Squirt all the glue into the jar

fill the GLUE BOTTLE with water

shake well and pour into the jar

screw lid on tightly

shake well


HAPPY DECOUPAGING!


PS: It dries clear

PSS: Please don't judge me by my 1970's back splash and counter top!  LOL

CoFfEe FiLtEr WrEaTh

A little obsessed with door wreaths, Yes I am....  They are relativity easy to make and I can make them cheaply enough.


Supply List:

Supply List
200 coffee filters
Foam pipe insulator
Wire hanger
Pliers
Duck tape
Tea bags
Food coloring
Old pillow case


This project is a little messy wear an apron :)


First thing I did was separate the coffee filters (I made this up as I went along.) Since they roughly come in stacks of 50 I used 100 for the salmon color and 100 for the brown-gold color.   


I got a large pot and filled it about 1/3 the way up with water and added red food coloring.


looks like jello (wiggle wiggle)

Shoved in about 100 of the coffee filters


I pushed them down into the red die and turned up the heat a little. I have no idea if this does nor does not make a difference, but since i was standing in the kitchen at the stove I thought why not.


As I was looking at it and GENTLY pushing them around I thought they were to pink. I got a little inspired and thought tea bags. Yep, you read correctly, tea bags. They really toned down the pink and gave me the salmon color... This was all an accident, a happy one :)


see the difference :)


after about 10 minutes I took them outside and put them on the concrete driveway to dry out.... Now, I'm a little impatient and thought of a better way!


The DRYER! 

I got an old pillow case and put them in it and got a rubber band (cloth one) and tied the pillow case, threw it in the dry and about 20-30 minutes later they were dry!!! I didn't take a picture of this step....

While the salmon dried....

I filled the pot with about 4 inches of water threw in 3 large tea bags and let it come to a boil.  Took the pot off the burner and shoved the other 100 coffee filters and let it sit for about 10 minutes or so.


When the salmon dried I threw in the gold coffee filter. While the gold were drying I put the foam circle together.  Take your wire hanger straighten it out and instert it into the insulator. Twist ends of the hanger together and then duck tape the seam.


Back to the filters they will come out of the dryer like this.


Unfold and lay them out, plug in the hot glue gun, and get out the stick pins.


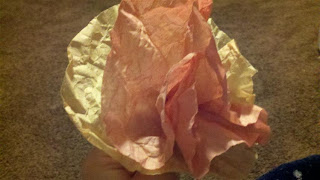
Take 1 gold and 1 salmon putting them together fold it up and twist the bottom... it makes a "flower"


flip it over


this photo is a little blurry (sorry 'bout that), now add a drop of hot glue and then stick a stick pin threw the glue.  then fold up the bottom a little to secure the pin. I alternated the colors so some were salmon on the outside some gold. 

Starting on the outside and working my way around stick the stick pin into the nose of the the hot glue gun and then push it into the foam circle


I worked from the outside in and around, then filled in as needed.


This is what I ended up with


My next project won't be a wreath!!! I've got to come up with something for St. Patrick's Day!


Oh... I almost forgot

wire hanger on hand
tea bags on hand
food coloring on hand
hot glue gun/sticks on hand
stick pins on hand
foam insulator $1.79
coffee filters $1.99

total cost $3.78


Saturday, February 18, 2012

Valentine's Door Wreath

Most of my projects are attempted in the evening when the house is getting settled down, or when my boy is in bed or hubby is at work. My projects are my therapy. This particular project was inspired by what else but Pinterest. First, let me just say thanks to my BF Lisa for introducing me to Pinterest. I am obsessed and have no problem letting anyone know!!! 


So, I saw this heart by The Idea Room and pinned it. The author made it look so easy I decided to give it a try.


This is my attempt at the Valentine's Door Wreath!

Because I am cheap I wouldn't pay the $6.00 at Hobby Lobby or Michael's for a foam heart. I saw somewhere probably on Pinterest a crafty crafter use a pipe insulator from The Home Depot in the shape of a circle and thought how could I make this work..... I immediately thought of Mommie Dearest (remember that crazy movie about Joan Crawford) "NO MORE WIRE HANGERS!" So, I went to my hubby's closet and took a wire hanger. 

I picked up 1 & 1/2 yards of red felt from Hancock Fabric at 40% off. I wasn't really sure how much I would need, but thought a yard and half ought to do it.

Here's my supply list:


·         Wire Hanger
·         Pliers
·         Foam Pipe Insulator
·         Duck Tape
·         Scissors
·         Red Felt (1 1/2yards)
·         Hot Glue Gun
·         Stick Pins (last minute thought)


With supplies in hand I got started.

First, I straightened out the wire hanger. Side note when I was a teenager (many moons ago) I would say Yes, Mommie Dearest to my mama just to tick her off. (Sorry, love you mama!)

"NO MORE WIRE HANGERS"

I wish I would have taken more photo's of the process.... Anyhoo, I ran the wire hanger thru the foam insulator then bent the ends of the wire together, this created a circle. After this I shaped it into a heart and duck taped the seam.


Then I began cutting up the felt. I cut the felt into 4 inch wide strips and then into 4 inch squares (don't worry if it's not perfect it works out and looks great in the end!)  Once I had a stack I then cut them into circles.

I have no idea how many I cut out, but it was alot! This isn't a project you are going to finish in about an hour. I worked on it for a couple of evening while the house was quiet. 

Moving right along...

Once you have your circles cut out, plug in that hot glue gun and get the stick pins out. I tend to overkill things. Alright, take a circle put a drop of hot glue in the center and then stick a pin thru it.

Push the felt up and it makes a cute little flower sort of thing.


Keep on keeping on... a drop of glue and push up the felt. Once you have a ton of these you'll still need more! LOL.... 

Ok, now you are ready to put the flower things into the foam (side note, this foam tend to melt a little with hot glue.) Take the stick pin and insert it into the end of the hot glue gun.


Now insert this into the foam heart. Hold it for 5-10 seconds until it doesn't wiggle.


This is the quickest part of this project only took about 1/2 an hour 45 minutes to complete. I started on the inside and worked my way to the outside. Move and adjust as needed. This is the only photo I took of this process and I'm not sure why.


Here's the finished product! :-) I took twine I had on hand and made a rosette out of one of the extra circles for the "hanger".  What do you think???


Oh yeah, total cost.
.99 cent foam insulator
$4.42 for the felt
hot glue had on hand
wire hanger had on hand
twine, again had on hand

$5.41

less than the clost of 1 foam heart!!!