Tuesday, March 4, 2014

St. Patrick's Day Deco Mesh Door Wreath


I have fallen in LOVE with dove tail ribbons on my wreaths! 

While browsing YouTube for inspiration on wreath making, I happened upon several FREE tutorials from Southern Charm Wreaths. After watching her tutorials I came up with my St. Patrick's Day Wreath.


  • I used 2 types of green foil deco mesh, which I bought at Hobby Lobby's after Christmas sale. $4.99 each! 
  • I bought 5 different types of ribbon, a 3" wide sheer with polka dots, 2 different 2" shamrock prints and 2 different 2"sheer greens. 
  • 1 wire wreath form
  • Dark green pipe cleaners 
  • Hot glue gun
  • 5 floral spays ( I have not idea what the technical name is, but you can see at the bottom of the first photo) I bought these for .10 cent each last year at Ole Time Pottery's after Christmas sale.
  •  Gold foam balls. I picked them up again, at the after Christmas sale from Hobby Lobby for .80 cents a bag!


Cut your deco mesh into 9" pieces. I used 40 pieces of deco mesh, 20 of each color.

Rabbit trail: I bought an all purpose self healing mat for easier measuring and cutting. Hobby Lobby and Micheal's have 50% off coupon fairly often, I picked this mat up for $32.00, worth the investment!!!

Learn from my mistakes! For quicker cutting I laid one deco mesh over the other. DON'T pull tightly on the bottom deco mesh, doing this will cause it to cut at an angle. Make sure it is laid flat without tension.

Once you have them all cut out separate them.

Attach the pipe cleaners to the wreath form. First, fold your pipe cleaners in half. Then, starting from the outside use a dab of hot and twist at the to of the support. Work your way around the form. Now, skip a row on the form (this will be the 3rd row from the outside.) In the center of the 3rd row attach a pipe cleaner. I will look like the 2nd photo when completed.


Attaching the deco mesh.


I used a method that adds more texture to the wreath.
  • Take a piece of your mesh and roll (not to tight)
  • Attach to the wreath about 5-6" in on both sides.
You will end up with a bubble in the middle.
  • When you start your next piece attach it to the end of the previous piece. They will overlap each other. Alternating your colors work your way around the exterior of the wreath.

 This is one layer on the exterior.

  • Add a 2nd layer to the exterior, again alternating your colors.


After you have added your 2 exterior layers move to the inside pipe cleaners and work your way around.

I used 3 layers on the interior pipe cleaners.

 (This photo shows 2 outside layers and 1 interior layer.) You can see how full it is getting.

You will have plenty of pipe cleaner length.

After the deco mesh was attached I added the ribbon.  I cut the polka dot, and 2 shamrock prints into 14" lengths, and the 2 sheer green into 12" pieces. I did this for 2 reason. 1st the sheer greens were only 9 feet in length and I needed enough to make it around the wreath. 2nd, I thought it might add a little more texture.

For the exterior row of ribbon. (I wish I would have taken photos) I used 2 ribbons per pipe cleaner. 1 sheer green and 1 shamrock print, I alternated the shamrock print and sheer green per pipe cleaner. Again, working my way around the wreath.

The interior row. I used 3 ribbons. The polka dot for each pipe cleaner and alternating the shamrock print and sheer green.


After this was completed I added the gold balls. 

There are 2 different styles and textures. the "sequined" balls are about 1/4" round I attached one to the end of each exterior row of pipe cleaners. The pipe cleaner simply pushed right into the ball. For the interior row I took the 1" ball and pushed it onto one of the pipe cleaner. The other end of the pipe cleaner I simply wrapped around the back of the wreath.

I found the 5 floral sprays and decided to add them at the last minute.  They are a little difficult to see in the photo. I need a new camera!!!

And this is the finished product!


You really should check out Southern Charm Wreaths and see her beautiful wreaths! (FYI, she does not know me nor I her, I just like what I see!)


Tuesday, February 25, 2014

Update to Organizing the Craft Room

Two years ago I started working on my craft room. You can see my original post here. 

Shortly after I cleaned everything out of the room, family came to town and it was turned into a bedroom, then an office, then storage, back to a bedroom and then back to storage.... Oh where did my craft room go???

About 6 weeks ago I decided it's time to get my craft room back! It took a couple of days to get everything cleaned out, and put back together.

Today I made a change I'm so happy with!

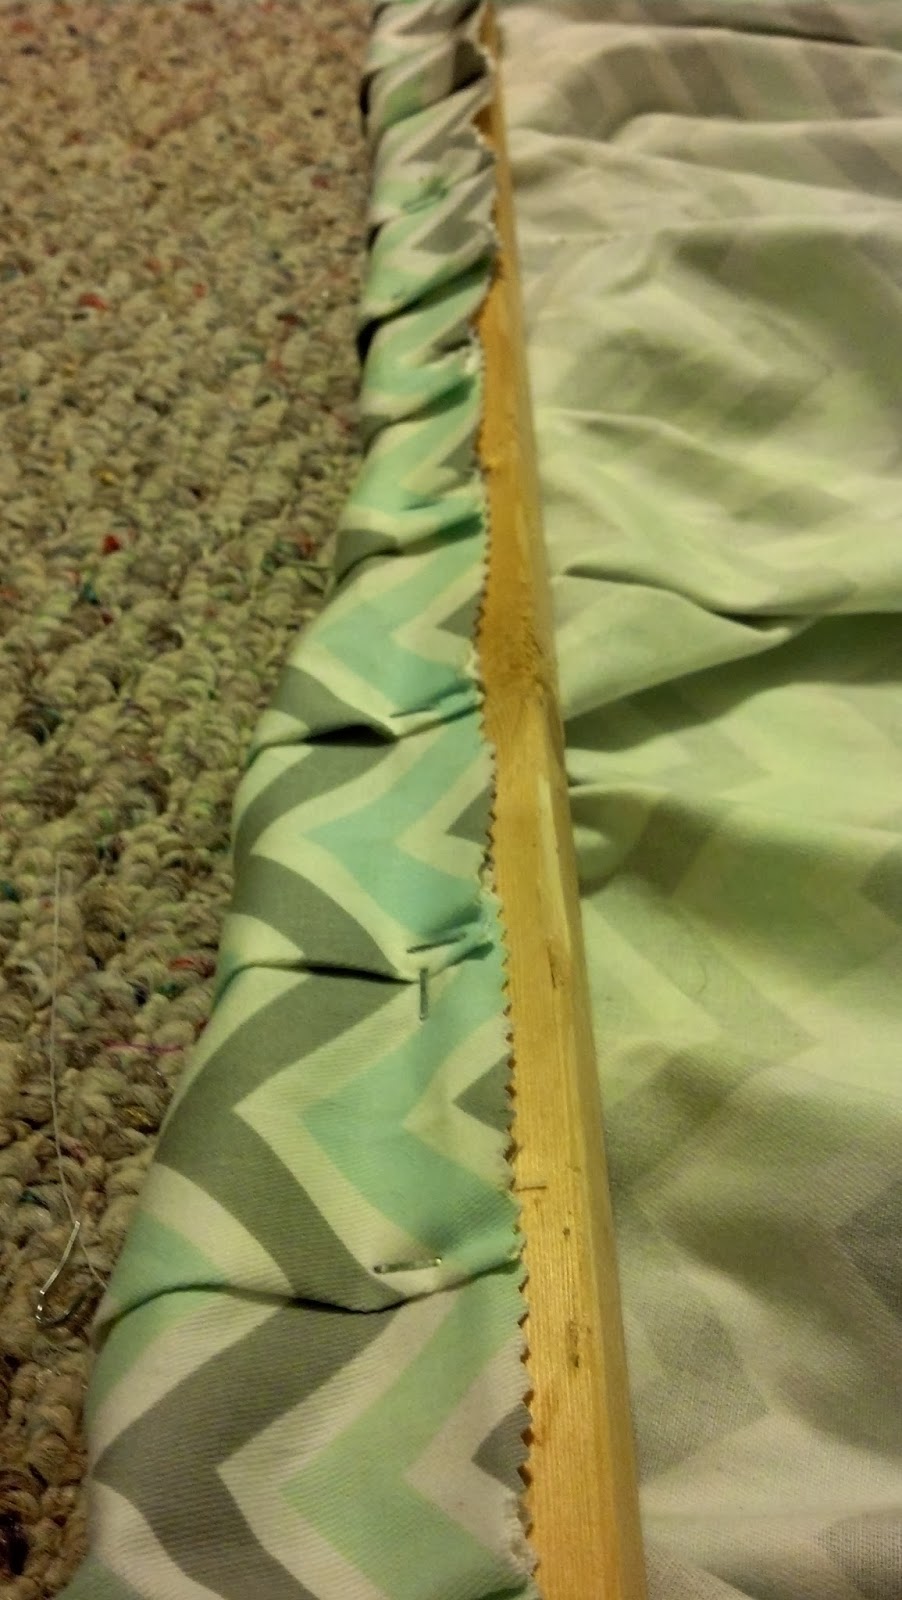
I have these wonderful built-ins perfect for storage. I added a skirt to the bottom covering the drawers and cabinet. 


I played this one by sight... I had the chevron material on hand for about a year or longer. Our town has a fabric warehouse selling once a month to the public at ridiculously low prices. I picked up 6 yard for $8.00! 

I used a 7 foot strip of 1x1. I seriously had no idea if this would turn out like I had pictured in my head... I figured out how to make a pleat and used the staple gun to hold in place.


Then I just lifted the fabric and screwed the 1 by in place.


I'm pretty happy with how it turned out. I did not sew the seam or the bottom of the fabric. I used pinking shears which should help the fabric hold up and keep from fraying.

Thursday, February 20, 2014

Fabric Covered Tin Cans For Organizing

~This was a fun and easy project to complete~


I've been working on my craft room for a year or two years... (See this post if you want to know how it became the craft room, because I am not about to bore you out of your mind!)
On to the project. I made several tin can organizers a couple years ago. I used scrapbook paper to make them and surprisingly they held up better than I thought they would.
Since my craft room is now slash my home office, I have once again began the task of revamping and organizing. I've become a little obsessed with tin cans which behooves my hubby to no end! (at this point he no longer asks what I am creating, he just waits for instructions, LOL)

Supply List:

Fabric of your choice
Tin cans
Hot glue gun
Scissors
Mason jar lid (say what!)
yard stick (OCD optional)
pen (OCD Optional)


Lay out your fabric and cut out a length enough to wrap around the can. 

This is where my OCD kind of takes over. For my own peace of mind I used my yard stick and pin and drew a line out on the fabric so it would be straight.

Can you see the line?

Because the tin cans vary in size I can't tell you what length to cut the fabric, however, I cut the width about 1/4" longer than the can on the bottom and about 1" longer on top. 


Add a vertical bead of hot glue down the can and press the fabric to it.

Wrap the fabric and add another vertical bead of hot glue.


Now run a bead of hot clue on the inside lip of the can and fold over your fabric.

repeat for the bottom of the can
(believe it or not but that sticker stayed intact through a dishwasher cycle!)

I used a mason jar lid to cut out a circle of fabric for the bottom of my cans. It just so happened to work perfectly.
 And again with the hot glue gun put a bead in the center an round the outer edge and press the circle onto the can. I think it makes the project look finished.
There are 2 cans here I used spray paint, twine and flowers. And although you cannot tell in the photos, the colors match perfectly with the owls.

The the twine cans I simply spray painted them, allowed to them to dry wrapped twine around them and then flowers for accent.

I am so excited about this project! I would love to see your tin can projects and know what you think of mine!

Happy Pinteresting,

Mel :D


Saturday, February 8, 2014

Key Holder

Seriously, I ALWAYS lose my keys. I am forever looking for them, asking everyone in the house where are they, and stressing out because I can't find them.  If I would simply put them in my pocketbook, on my dresser, or even on the kitchen counter... But nope, I find them everywhere, under the couch, in the bath room, left in the door (yes, on multiple occasions), in my son's room, in the basement, and I have even found them in the spice drawer!!!

I have decided since I am turning the BIG 4-0 this year it is time to get my key disorganization under control, and that is how this little project got started.


This took about an hour and that's because the paint had to dry. 

You will need:

Fabric (you could also use scrapbook paper)
Picture Frame
Hooks
Your Initial
Spray Paint


I found this adorable print last month at Phoenix Fabrics. They are a fabric warehouse open once a month to the public. I go almost every month! I think I paid $4 for about 2.5 yards. I have plenty left over for my pillows.


My initial and the frame came from the Goodwill about a year ago, I paid $1 each for them. I spray painted them with this wonderful product from Valspar. The color is called Exotic Sea in a gloss finish. I bought this a year ago at Lowe's I think it was around $5.


I laid the glass out and cut about 1/4 of an inch around it.


Placed the glass back into the now painted frame, put fabric on top of that, and then the back of the frame.


I hot glued my initial and centered to the picture frame and then added 4 hooks at the bottom.


I think it turned out really well! And since I had everything this technically was a FREEBIE :)


See the aforementioned keys!!! They are actually where they should be, LOL!

I would love to know your thoughts!!!

Have a wonderful day,

Mel:D


Friday, January 31, 2014

South Carolina Gamecocks Rag Wreath

This was a fun wreath to make!!!


It started with this


1.5 yards of Gamecocks Fabric
1.5 yards of black broadcloth
1.5 yards of garnet Organza 
I had white tulle, black tulle, and a red tulle I didn't end up using, but it's in the photo.

Cut your fabric in to 9"x1" strips.
(I cut all this tulle before I decided not to use it!) 

Set up an assembly line rotating your fabric strips.

Starting at the inner most circle of your wire wreath form begin tying your strips on.
I didn't take a photo for this process with this wreath, but below is a photo from my 4th of July rag Wreath.


The fabric was enough for 3 rings

If I do another on I think I will double the Gamecock Print and make every other strip the Gamecock Print.

After I finished all the ties I got to work on the USC letters.

The letters were a bit tricky because they are heavy and I didn't want them to squish the fabric. I came up with something, but PLEASE if you figure out a better way let me know!!!!

Let me back up a couple of steps.

First I added the polka dots. I found the perfect sample for .50 cent at Lowe's! 
(please ignore the background mess!)

It truly is a perfect Gamecock Garnet, although it does show up bright in this photo!


I painted the outsides white


Now, moving forward...
I added 2 hooks to the backs of the letters U and C, one on top and the other on bottom


Again, with the no photos. I took a piece of heavy gauge wire (I have no idea what gauge, I just know I had to use the needle nose pliers to get it to bend!) I threaded it through and hot glued it into place. 

Once this was done, I turned the letters over and used the staple gun to secure the letters together and added a drop of hot glue for good measure.  
*Note: make sure your wire is all cut the same length and better to be to long than to short!

I started the "C" and centered it to the bottom of the wreath and the others just lined right up. *This is why I glued and stapled the letters together.

This part is a little tricky and why I asked if you have a better idea to let me know!

With the letter face down take the wreath and place it on top of the letters. Remember I said I didn't want the letters to squish the fabric...  Lift up on the wreath enough that the letters slightly touch the fabric. Then take  your needle nose pliers and bend the metal over the wire form. (kind of like fishing hook or "J")
You will do this to a both the U and C. 

Now a Check:  Flip the wreath over and your letters should be right where you want them. If not you can adjust them here.  

Again, flip the wreath over and now secure the letters in place, using the needle nose pliers wind the hook around the wire form 3 times. This REALLY secures your letters in place and you can add a drop of hot glue for good measure.

It needed something else, but I didn't want a bow. How about some garnet feathers!!! SAY WHAT!


I found these Gems a year ago at Hobby Lobby for 90% off!!!!!!! 

Get a black pipe cleaner

I took 4 bunches of feathers, 2 to the left and 2 to the right and bound them with a pipe cleaner (these are not the ones I used, but for visual purposes here you go)


I then attached them with a pipe cleaner.


And Voila!!!


High 5 Gamecock Nation!!!!